
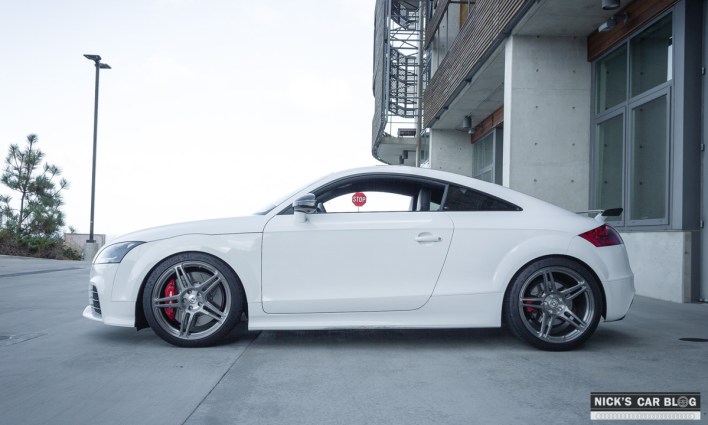
When I had my wheels refinished recently I used it as an opportunity to do a modification I had been meaning to get around to for a long time – painting my calipers red.
The OEM calipers on my Audi TTRS were made by Brembo, but sadly Audi decided to finish them in black and put a RS logo on them, leaving a very understated appearance.

In my opinion Brembos are a great brand, and generally speaking look best in their trademark bright red finish with a white Brembo logo.

I got quotes for professional caliper painting that ranged anywhere from $800-1,200 which seemed insane, as I remember painting my calipers nearly 20 years ago as a kid with a few rattle cans of caliper paint for less than $20. In nearly 20 years the DIY solution had to have gotten better?
Upon scouring the internet at various options, there were two kinds of DIY kits available to paint your calipers:
- Aerosol / Spray Can – The caliper paint comes in a spray paint can and depending on the solution can be multi-stage (base, paint, clear) or single-stage (base & clear all in one can) solutions. The pros of this approach is that there will be no brush marks, the cons is that you have to be meticulous with taping and masking or you’ll get overspray where you don’t it. The main disadvantage is that you really need to take the calipers off to do this right, otherwise it’s hard to paint the backside of the caliper and a lot of the edges from the right angle.
- Brush-On – As opposed to spray can, this is a much thicker solution that includes both base & clear in one. You mix the paint and reactor to activate the enamel, then paint it on. Advantages include higher maximum temperature, more precision application via brush, and the ability to paint areas that would be hard to reach with an aerosol can.
After doing a ton of research, I landed on the G2 brush-on kit. It included everything you needed including a brush, brake cleaner, the paint and even a stirring stick. I also picked up some decals as well:
Upon receiving the kit, the instructions were fairly straightforward.
The most important ingredient is time – the longer you spend on preparation, the better it will come out…and by time I’m referring to three things in particular:
- Prep time – take your time masking and prepping, I spent at least 10-15 minutes per caliper to sand, clean and mask the area.
- Application time – take your time applying it to avoid any drips or uneven application. The box tells you how long to wait between coats, and plan for 2-3 coats so up to 1-2 hours of application time.
- Drying time – you need to let the car sit for at least 12 hours after applying, ideally longer. I left my car overnight.
Preparation Notes for G2 Caliper Paint
Anything on the rotor face itself will burn off, but you’ll want to avoid drips on the edges or the brake pads themselves as well – use the smaller brush for detailed crevices and the larger brush for the bigger areas.
Even though you don’t need to worry about overspray, you should put something down below the calipers to catch any drips, and tape off any hardware or lines to ensure a clean install.

I spent a long time taping up each side, although I opted to leave the calipers on the car…with the wheels off I had plenty of room to reach the underside, back, and bottoms of each caliper.
I also sanded the front face of the rotor to make it completely smooth and remove the RS logos from factory, and that also helped ensure the surface was completely smooth. I then did several rounds of soaking in the included brake cleaner, and followed a thorough wipe down between each cleaning until I was confident all dirt and contaminants were removed.
Application notes for G2 Caliper Paint

When it was time to start applying the paint I followed the instructions to exactly. I ended up doing 3-4 coats, although would have been fine stopping at 2-3. The enamel once hardened is quite permanent, so I recommend removing any drips immediately or it will stain your garage, house, or whatever else it gets on.
Likewise you should wear gloves and clothes you don’t really care about, and keep some paper towels handy. I was wearing flip flops when applying and got some drips on my toes, and it looked like I had painted nails for weeks until they finally grew out!
Finished Result & Review of G2 Caliper Paint
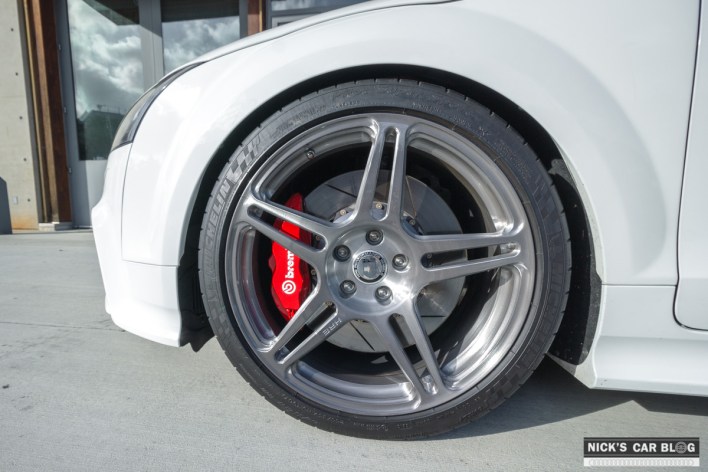
All that being said, the application was fairly easy and more importantly, the results were amazing. I waited until the calipers were a few hours dry to apply the stickers, and then let it continue to drive overnight. The box recommends at least 8-12 hours, so I played it safe and gave a full 24 hours before installing wheels or taking off jack stands.

I was most worried if you could see brush strokes, but as the enamel dries it changes texture and smoothens out to a nice, consistent gloss. As long as your application is relatively even, as the chemical compounds activate the result will be really smooth and professional looking.
After driving on this finish for a few months, I can also attest to its durability. There has been no chipping or issues, and they clean really easy whenever I’m washing my car.
Likewise the red matches the OE Brembo finish well, and hasn’t faded over prolonged driving or heat.
I’m glad I didn’t go spray can as I remember that being challenging last time I did it, and I also didn’t want to have to remove my calipers and bleed my brakes or anything of that nature.
My biggest regret is not doing this sooner, as this modification would have looked great on my black wheel or gold wheel finish too…and with how easy and relatively cheap it was (around $55 all-in), it was something I can easily redo in the future should I change my mind on the finish.

My only other advice is that if your calipers are not actually made by Brembo, don’t put on the Brembo stickers.
There are plenty of options on Amazon for the logo of the manufacturer (Audi, VW) or you can even have custom stickers made to say whatever you want, or just leave them blank. Pretending to have brakes you don’t is uncool, and you likely aren’t fooling anyone.
You’ll notice in the rear caliper I opted to leave them blank as my rear calipers are not Brembo and nothing special. The face is also too small to fit a logo well, so even putting on an Audi logo seemed out of place.
Once you’ve let the enamel cure for a few days, you can consider putting on a ceramic coating for extra protection. I’ve done that on both finishes and found clean-up to be super easy, just make sure you get a ceramic coating made specifically for wheels and brakes to handle the higher temps.
In the end, I’m excited for a little pop of red – a little splash of color makes a big difference!
That’s all there is to it! If any questions, leave me a comment below.


Did you apply a clear coat over the decals?
I did not, the decals are meant for high temp applications – and so far, no problems!
Once again your blog has inspired me to another mod. Thanks.
Hi Nick,
Good job on those Cali[pers.
The problem that everone has is to find the exact Red for the Brembo.
What do you think regarding the color matching?
Thanks!
I don’t know if it is EXACTLY the right color if you’re super OCD, but looks pretty damn close to me…
Nick, where did you purchase the G2 paint and stickers? Thank you, Rich
Amazon for the paint, and Cripsy Decals for the stickers: https://www.instagram.com/crispy_decals/?hl=en
Hey, did you just go for the normal red that g2 offers? Or did you go for a special red?
Just the normal red!
‘Review’ just sounds like a sales pitch, whether it is or isn’t. Needs less time talking about how great it is and more time with actual helpful info like buy more brushes because the one they give you is crap and will dry anyways by time cycle through calipers
I don’t recall having an issue with the brushes or drying time, but good tip for others in case they run into it.