
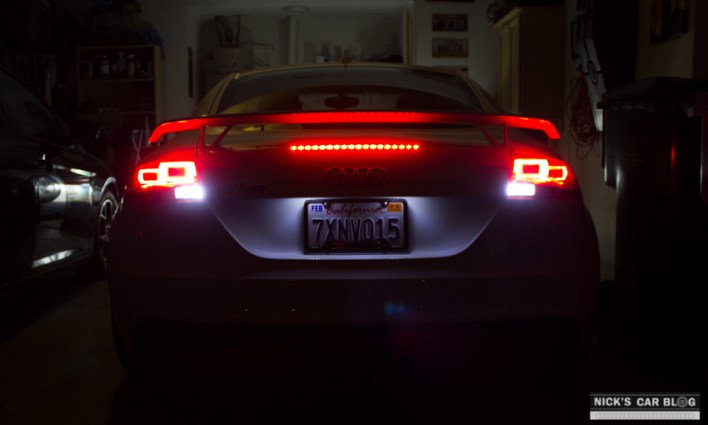
When I picked up my used Audi TTRS, I was delighted to find it already had the “Interior LED lighting package” installed as part of a broader Tech Package (a $3,500 option that also included navigation, parking sensors, and adaptive headlights…). I also noticed the TTRS already had LED license plate bulbs too, a mod that I really enjoyed on my B7 S4. Alas, Audi somehow missed the reverse lights when upgrading to LED bulbs on this car, leaving some really yellowish halogens in place – no bueno. I spent some time taking apart the tail lights and playing around with bulbs so that anyone who finds this can replace a burnt out tail light, or if they feel like upgrading you can replace the reverse lights with LEDs to match your license plate bulbs. You can see the stark contrast in reverse lights below when I took a picture with only the passenger side bulbs swapped:

This DIY is very simple, and works for any MK2 (2006-2014) Audi TT including the TTRS. If you just want to change the brake light bulbs to get rid of a bulb out error then you can follow the DIY and skip Step 4, and if you feel like upgrading to LED license plate bulbs then you just have one extra step to add resistors to account for the reduced draw of the much more efficient (and better looking) LEDs. This DIY only should take you <30 minutes in total, and doesn’t take any special tools or mechanical skills – it’s about as simple as it gets.
Step 1: Order Parts

Installation is pretty simple, and doesn’t require any special tools other than a wire stripper, if you consider that special. Otherwise, a flathead screwdriver, a phillips screwdriver, double-sided tape, and needle nose pliers are all that is necessary…and you can make do without the pliers if you have to.
Reverse Bulbs (LED)
The MK2 Audi TT (2006-2014) uses a 921 bulb for the reverse (and the other two bottom indicators) and the resistors you’ll need are 50 watt, 6 ohm load resistors, both of which can be found below.
Brake Light Bulbs (Halogen/Stock)
Likewise if you need to replace the main brake light bulbs, those are a size 7506 – I’d recommend sticking with halogen instead of LED for those. And if you have bulbs along the lower edge that are out (smaller bulbs), those are a size 921…again, I’d recommend sticking with halogen bulbs for the brakes themselves, and only changing the reverse bulb to LED if you want to.
Step 2 – Remove Tail Lights to Access Bulbs

Removing the tail lights are much easier than you’d think – you only need a flathead screwdriver and opposable thumbs for this part. Open the rear hatch and along the carpeted wall you’ll see a small circle on the outer edge near the tail light. Pry open the circle and you’ll see something that looks like the above, and deep inside is simply a flat headed screw that is holding everything in. Unscrew by turning left until it comes out.
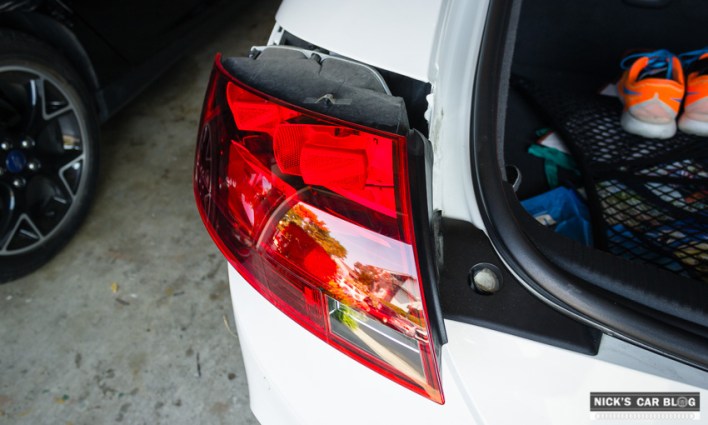
Next simply pull the headlight out and away from the car itself. You will need to use a little force, but just work along the edges. There are three clips that hold it in, so you need to pull hard enough to pry those out, but not so hard you’re going to break the plastic housing. Just be patient, but it will come without excess force.

Lastly, unclip the plug and while you’re in there, go ahead and clean all of the dirt that was behind the tail light – I know my car was filthy…

Step 3 – Remove Backing to Expose & Replace Bulbs

On the back of the tail light you’ll find five (5) Phillips screws holding in the backing plate. Turn them all left until they’re loose, and the backing will come off the tail light housing and you’ll be able to see and replace all of the bulbs.

It should be fairly obvious which bulb is the reverse bulb, but in case it’s not see the above picture. At this point you can replace any other bulbs that are out, although I would recommend just using standard halogen bulbs for those in size 7506. Likewise the other two bulbs along the bottom row are also size 921 if you want/need to replace those while you’re at it.
Step 4 – Install Resistors

Resistors sound much harder to install than they really are, so I’ve gone into a lot of detail here to show how straightforward it is. Simply put a resistor just creates a bridge between two wires (a positive and a negative, in this case black and brown respectively) and interjects extra load into the wire to fool the computer into thinking the bulb is drawing the extra load/current. To install the resistor, you start by stripping a small section of the brown wire and a black wire with a thin blue stripe – the brown is negative, and the black/blue wire is the power for the reverse lights.

You then use the supplied red clips to connect the resistor into the wires – it doesn’t matter which end of the resistor goes to which color wire, you’re just creating a bridge for current to flow between them. You’ll want to strip the ends of the red wires of the resistors so that you can create a connection, then the red plastic connectors have a metal piece that slides down like a guillotine to create a metal-to-metal connection between the exposed areas of the brown/black wire and the exposed areas of the red resistor wires. You can use the needle nose pliers to help open the red resistors a little more so you can fit the brown/black wires all the way across, and then use the pliers again to help clamp the metal “guillotine” in the clamps down all of the way to create the strong connection. At this point you should be able to tug on either wire and have it locked down firm into the red connectors. Go ahead and turn the car on, put in reverse for 5-10 seconds, and confirm it is working – no bulb out error should show on the dash, and afterwards the resistor should be hot. Be careful, as they can get REALLY hot if on a while and cause fairly serious burns if you’re not careful, but for just 5 seconds a quick tap should reveal them to be warm but not going to burn you. If it isn’t working, you need to check your connections and make sure the red clamps are making good contact with the exposed part of the wire on both ends.

Once working, use the double sided tape to mount the resistor. I chose the spot above because it’s mounted on metal and can help disperse heat, and it’s also not near anything that could potentially melt if I’m in reverse a long time and the resistor gets super hot. You also need to make sure there is enough slack in the harness that you can still plug it back into the tail lights once re-installed.
Step 5 – Reinstall Tail Lights & Enjoy

To reinstall the brake lights, simply pop them back into place (you may need to tap them back into place where the three sockets snap back in) and then screw back in the flathead inside the trunk. All set! You can then admire your handiwork, and have reverse lights that emit a nice cool LED look and not have to deal with any bulb out errors you might have had before.

Best of all, the LED reverse lights improve visibility when backing up, so this is more than just an aesthetic mod, it’s functional too. Considering how expensive it is to modify this car, it’s great to find a $10 mod that makes such a nice difference.

HI Nick, FYI Audi provide the tool to remove the tail light in the truck spare tools
Ha, good to know! Not really necessary, but I suppose that makes it even easier.
Any Particular reason to not change the brake bulbs?
I believe they are a little more sensitive in terms of electronics and warning codes. You could give it a shot, but I didn’t want to mess with it.
Hello Nick. Great job on the tail lights. I have a different question for you… could you provide the Manufacturer Part Number of your tail lights? They somehow look way better than mine. Thank you in advance.
It should be 8J0945096M (right) and 8J0945095N (left)…hope that helps!
If one opts to convert brake lights, tail light, turn signals, and backup light to led, would they all need resistors added to avoid the bulb out warning? One would need 4 sets of the resistors you have linked from Amazon?
Hey Nick, It has been a number of years since you performed this mod. I am wondering how your resistors are holding up. More recently, folks have indicated their resistors are burning out after a short time.
I didn’t have any issues in the ~2 years I had them installed, but the car has since sold so I don’t know the current status.
Hi Nick , i replaced the brke light bulb on our Mark 1 , but the light on the dash is still on , is there something i need to do ?, Cheers Gav
Not to my knowledge, that should clear it up. Maybe check no other bulbs out in that housing? Any bulbs out in either rear housing will cause the light to go off, doesn’t have to be just the brakes…and they all tend to go out around the same time FWIW.
Could you please release the spec of that resistor? Thank you.